HTML (HyperText Markup Language) can be utilized in Ripple surveys to add instructional text, provide directions, or include disclaimers. It also allows for text formatting, spacing adjustments, and the inclusion of elements such as links, tables, or graphics that are not part of standard survey questions.
Key Guidelines:
- HTML can only be used within the Html survey question type.
- It cannot be applied to any other question types.
- It is useful for enhancing the appearance and structure of survey content without affecting question functionality.
Common Uses of HTML in Surveys:
- Display instructions or additional information
- Format text (bold, italics, spacing, headings)
- Insert hyperlinks for external resources
- Include tables or other structured content
How to Add HTML Elements in Ripple Surveys
Follow these steps to insert and customize HTML elements within your survey:
-
Open the Survey Creator
- Navigate to the Survey Creator in Ripple.
-
Add an HTML Question
- Locate the Toolbox panel.
- Select and add the Html question type to your survey.
-
Modify HTML Content
- Go to the Properties panel.
- Enter the text you want to display in the survey.
- Use HTML elements to adjust formatting, spacing, and appearance.
-
Save Your Changes
- Click "Save Survey" to apply the modifications.
By using HTML, you can enhance the presentation of your survey by adding structured formatting, links, tables, or other visual elements.
TIP: You can click the “Test Survey” button to view your survey and HTML elements before administering.
Common HTML Elements for Survey Formatting
HTML provides various elements to enhance the appearance and structure of your survey text, URLs, and images. You can combine multiple elements to achieve the desired formatting.
1. Formatting Spacing
Modify text spacing by creating paragraphs, line breaks, bulleted lists, and adjusting font size.
New Paragraphs
Use the <p> tag to separate content into distinct paragraphs.
- Start a paragraph:
<p> - End a paragraph:
</p>Example:
This structure improves readability and organization in your survey content.
 html <p></p><p></p> Indents
- To turn on: <p style=”margin-left5%;”>
- To turn off: </p>
- Example: <p>Thank you for your interest in the Ripple Research Lab. We appreciate your interest in joining our Registry and future studies. </p><p style="margin-left:5%;">If at any time you no longer want to be a part of our study, please let us know by calling us at 555-555-5555. You will need to tell us your name, date of birth, and email you used to fill out your survey so we can remove you from the Registry.</p><p>We look forward to having you and will reach out soon!</p>
NOTE: You can make the indent larger by changing 5% to a larger number. To make the indent smaller, decrease the number lower than 5%.
 Line Breaks
- To turn on and off: <br>
- To turn off: </br>
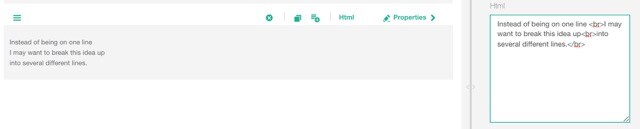
- Example: Instead of this being on one line <br>I may want to break this idea up <br>into several different lines.</br>
WARNING: Do not use two br tags consecutively!
Create an unordered bulleted list
- To turn on: <li>
- To turn off: </li>
- Example: <li>This is inclusion point one.</li> <li>This is inclusion point two.</li> <li>This is inclusion point three.</li>
NOTE: You will need to start each point with <li> and end each point with </li> to differentiate between the different bullets
 Create an ordered list
- To turn on: <ol>
- To turn off: </ol>
- Example: <ol>1. You need to meet eligibility criteria one.</ol> <ol>2. You need to meet eligibility criteria two.</ol> <ol>3. You need to meet eligibility criteria three.</ol>
NOTE: You will need to start each point with <ol> and end each point with </ol> to differentiate between the different list items.
 Section Headings
- To turn on: <h1> ; <h2> ; <h3> etc.
- To turn off: </h1> ; </h2> ; </h3> etc.
- Example: <h1>I want this text to be larger.</h1> <h4>This text should be smaller.</h4> <h6>This text should be very tiny.</h6>
NOTE: The smaller h number represents a bigger font size; <h1> is the highest section heading and <h6> is the smallest.

Format Words
You can also modify how your words appear, including bolding, italicizing, underlining and the color of the font. You can also add a URL for your participants to learn more information.
Bold- To turn on: <b>
- To turn off: </b>
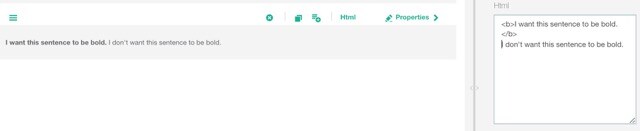
- Example: <b>I want this sentence to be bold.</b>
- To turn on: <i>
- To turn off: </i>
- Example: <i>I want this sentence to be italicized.</i>

- To turn on: <u>
- To turn off: </u>
- Example: <u>I want this sentence to be underlined.</u>

- To turn on: <p style= “color:Red;”
- To turn off: </p>
- Example: <p style= “color:Red;”> I want this sentence to be red because it is important!</p>
NOTE: You can change the color from Red to the color of your choice by modifying the HTML.

Separate your Text Using Borders and Dividers
Colored Borders around Text- To turn on: <h4 style=”border:2px solid Red;”>text
- To turn off: </h4>
- Example: <h4 style="border: 2px solid Red;">This is a very important section of the form. I want this separated into a box.</h4>
NOTE: You can replace h4 with any other section header, or with the paragraph option. Additionally, you can modify 2px to a larger number to increase the thickness of the border, or a smaller number to decrease the thickness of the border. You can also change the color from Red to a color of your choice.
 Dividers
- To turn on: <hr class=”solid”
- To turn off: >
- Example: <p>I want to separate this text from the text below using a divider.</p> <hr class="solid"><p>Here is the rest of my text that I want separated.</p>
NOTE: You can create a dashed, dotted, or rounded line by replacing “solid” with the word “dashed” , “dotted” , or “rounded” respectively.

Additional Elements
URL - Open in the Same Tab- To turn on: <a href=”url”>Website’s Name
- To turn off: </a>
- Example: Here is the <a href= “https://www.ripplescience.com/”>Ripple Science Website</a> to learn more about our features.

- To turn on: <a href=”url” target=”_blank”>Website’s Name
- To turn off: </a>
- Example: Here is the <a href="https://www.ripplescience.com/" target="_blank">Ripple Science Website</a> in a new tab to learn more about our features.

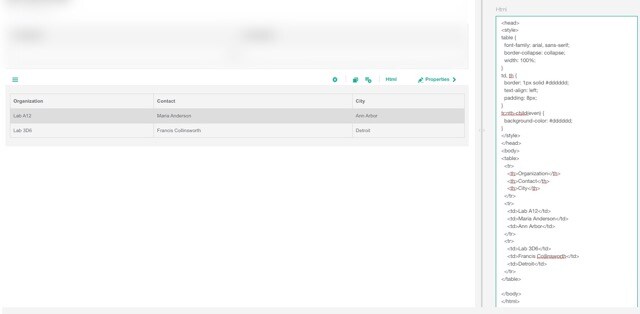
To indicate table data:
- To start a table: <table>
- To create a row: <tr>
- To end a row: </tr>
- To create a table header: <th>
- To end that table header: </th>
- To add a data point to a cell: <td>
- To end that data point for a cell: </td>
- To end a table: </table>
- Example: <style>
table {
font-family: arial, sans-serif;
border-collapse: collapse;
width: 100%;
}
td, th {
border: 1px solid #dddddd;
text-align: left;
padding: 8px;
}
tr:nth-child(even) {
background-color: #dddddd;
}
</style>
</head>
<body>
<table>
<tr>
<th>Organization</th>
<th>Contact</th>
<th>City</th>
</tr>
<tr>
<td>Lab A12</td>
<td>Maria Anderson</td>
<td>Ann Arbor</td>
</tr>
<tr>
<td>Lab 3D6</td>
<td>Francis Collinsworth</td>
<td>Detroit</td>
</tr>
</table>
NOTE: Please refer to your favorite HTML tutorial website for additional HTML elements.