Ripple makes it easy to manage participants by allowing you to move them between user-defined statuses within the Potential and Enrolled participant tabs, as well as from the registry into a selected study.
Participants in Ripple are categorized under Potential or Enrolled tabs within a study. Each tab includes customizable statuses (e.g., In Screening, Awaiting Follow-Up, Not Contacted). Ripple provides flexible options to move participants between statuses, either individually or in bulk.
Moving Participants Within a Tab (Potential or Enrolled)
You can move participants between statuses within the same tab using two methods:
1. Bulk Move Using the Global Action Bar
-
Navigate to the Potential or Enrolled tab in your study.
-
Select the checkboxes next to the participants you want to move.
-
You may select participants across multiple statuses (e.g., In Screening, Awaiting Follow-Up).
-
- At the top of the page, use the Action Bar dropdown to select the destination status.
 4. Click Apply.
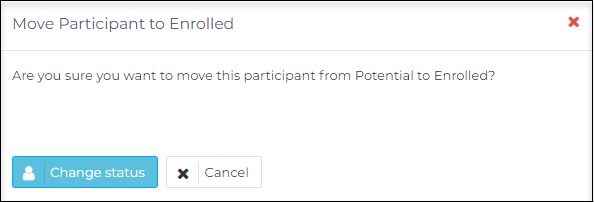
5. A confirmation alert will appear showing how many participants will be moved. Confirm to proceed.

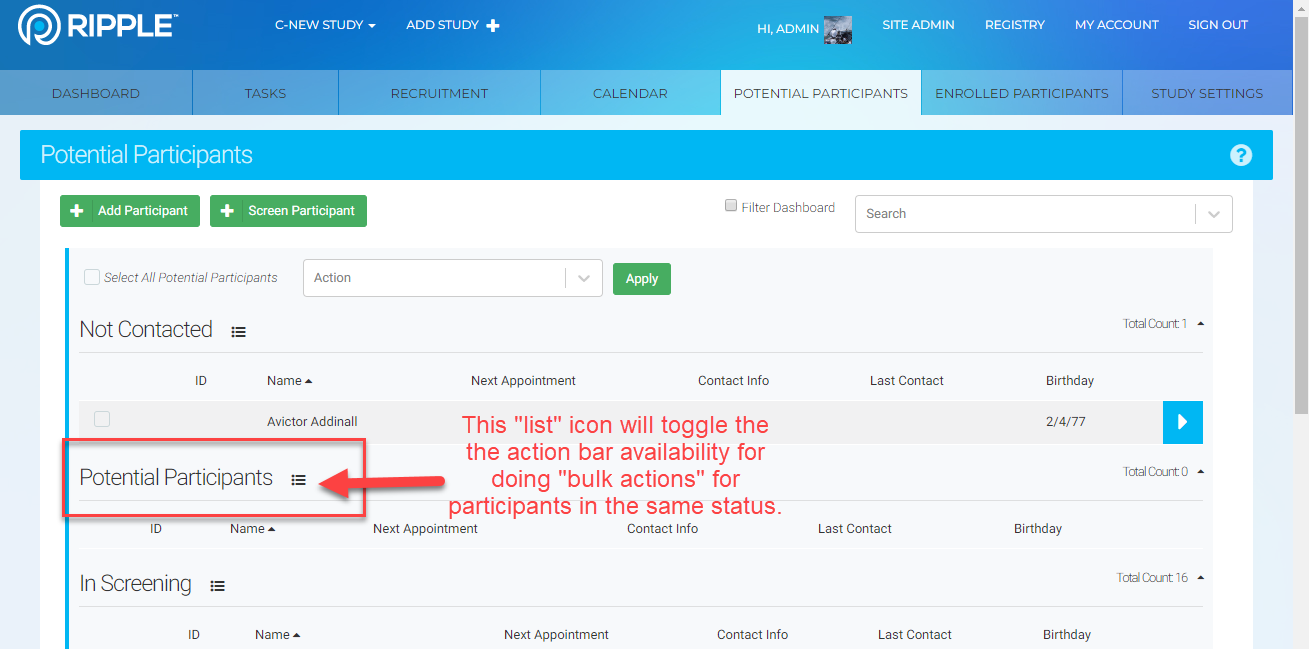
Example: Moving Participants Between Multiple Statuses
📸 In the first screenshot above, the red box and arrow highlight the global action bar, which allows you to move participants selected from multiple statuses within the same tab (e.g., Potential).
Scenario:
Suppose you want to move participants currently in the "In Screening" and "Awaiting Follow-Up" statuses to the "Not Contacted" status.
Locate and check the boxes next to participants in both the In Screening and Awaiting Follow-Up sections.
(Note: "Awaiting Follow-Up" may not be visible in the screenshot but is included in the action.)Navigate to the top of the page and open the Action Bar dropdown.
Select "Not Contacted" as the destination status.
Click Apply.
A confirmation alert will appear showing how many participants will be moved. Confirm to proceed.
This method allows for efficient status updates across multiple groups without switching views or tabs.
NOTE: The global action bar can move participants between any statuses within the same tab. Deleting a Participant from a status or from a study can also be completed here.
2. Bulk Move Within a Single Status
Each individual status section includes a list icon that toggles a localized action bar.
-
Click the list icon in the desired status section (e.g., In Screening).
-
Select the checkboxes next to the participants you want to move.
-
Use the localized Action Bar to select the target status.
-
Click Apply.
-
A confirmation alert will appear with the number of affected participants.
Selecting Participants in Bulk
There are two bulk selection tools available:
-
Select All Potential Participants – Selects all visible participants across all statuses in the Potential tab (limited to visible page only).
-
Select All in Category – Selects all visible participants within a specific status (also limited to the current page).
⚠️ Important: If your status or tab spans multiple pages, you will need to repeat the bulk select action on each page.
Moving Participants Between Potential and Enrolled
Participants can also be moved between Potential and Enrolled statuses using the same action dropdowns.
-
All available statuses from both tabs appear in the dropdown list.
-
Statuses are clearly labeled to indicate whether they belong to the Potential or Enrolled category

You can perform this action:
-
In bulk using the global or localized action bars.
- Individually from within the participant's profile.
Moving from within the Participant Profile Card
You can move a single participant to a new status directly from their profile:
-
Open the participant’s profile.
-
Scroll to the section just below the Custom ID field.
-
Use the dropdown menu to select the new status

-
Confirm the change in the alert dialog that appears.
Deleting a Participant from a Study in Ripple
Ripple allows you to delete participants from a study using three different methods, depending on whether you are removing a single participant or multiple at once.
NOTE: Deleting a participant from a study, removes the participant from the study only—the participant record will still remain visible in the Registry.
Method 1: From the Participant Profile (Potential or Enrolled)
You can delete an individual participant directly from their profile.
-
Navigate to the participant's profile page.
-
Click the red garbage can located in the top-right corner of the profile card.
-
Select Delete Participant from the dropdown menu.

4. A confirmation alert will appear. Type DELETE to proceed with the deletion then enter.
Method 2: Using the Bulk Action Bar
To delete multiple participants at once:
⚠️ Important: Only participants visible on the current page will be selected. Repeat the process for additional pages if needed.
-
Go to the Potential or Enrolled tab in your study.
-
Use the checkboxes to select one or more participants.
-
At the top of the page, open the Action Bar dropdown.
-
Scroll to the bottom of the dropdown and select Delete.
-
Confirm the deletion in the alert window that appears.
Method 3: From Within a Status Section
If you are working within a specific status (e.g., "In Screening"):
-
Click the list icon next to Enrolled or Potential Participants for that status section to reveal the localized action bar.
-
Select the participants you want to delete.
-
Use the dropdown in the localized action bar to choose Delete.
-
Confirm the deletion when prompted.
How to Track When a Participant Was Moved to Enrolled Status
-
Go to your Study and click on Study Settings.
-
Navigate to the Display tab.
-
Under the Enrolled Participants section, click the green + Add A Column button.
-
In the dropdown menu that appears, select "Date added to Enrolled".
-
This will add a column to your Enrolled Participant List that displays the date each participant was moved to the Enrolled status.