Each participant’s profile card includes a Log Section that tracks key interactions and records. The logs are categorized into four sections: Contacts, Emails, Consents, and Comments.
Log Categories & Functions
-
Contacts Log
- Records all interactions with a participant, including in-person visits, phone calls, and other contact points.
- Used for tracking communication history across the team.
-
Email Log
- Enables the sending of direct, one-way emails to participants.
- Maintains a record of all emails sent through this system.
-
Consent Log
- Tracks and stores all collected consent records from participants.
- Ensures compliance and documentation of participant permissions.
-
Comment Log
- Allows team members to add notes and comments following participant visits or interactions.
- Facilitates internal communication and record-keeping.
Importing & Exporting Logs
- Site Admins have the ability to import and export logs through the Import and Export sections in the Site Admin tab.
Importing Logs
To import new logs, follow these steps carefully to ensure successful data entry:
1. Access the Import Tool
-
- Navigate to the Site Admin tab (red).
- Locate and click on the Import tool (green).
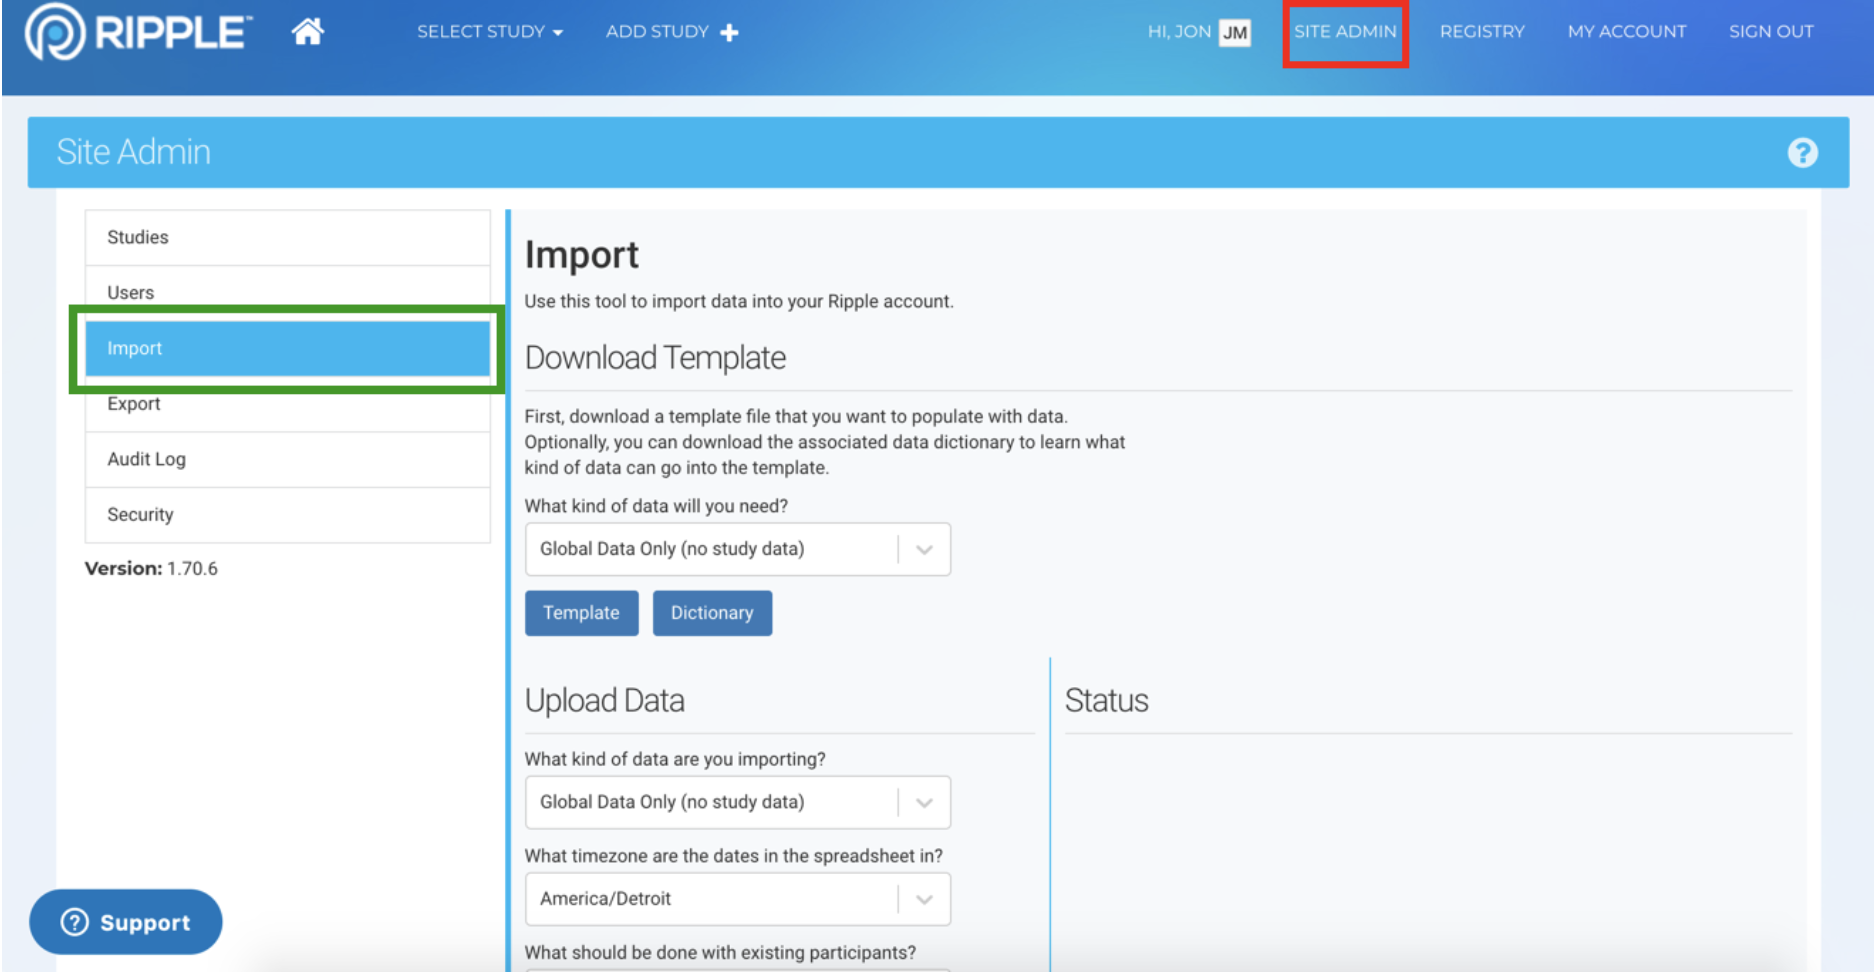
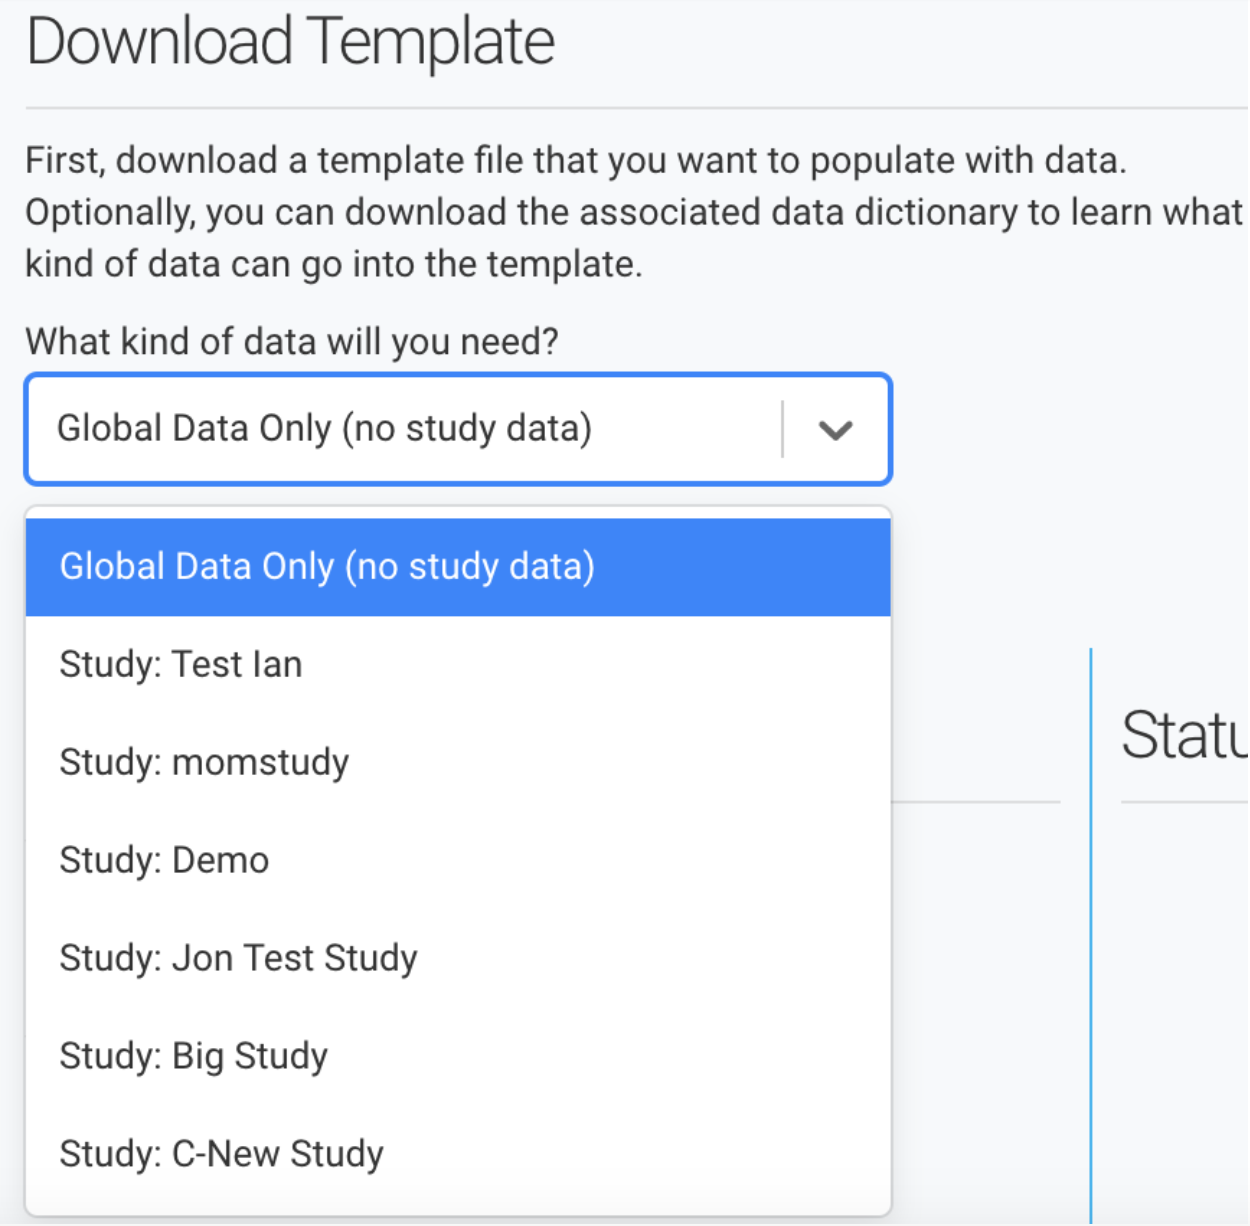
2. Select the Study
-
- Choose the study where the logs will be imported.
- Click on the Global Data Only field to open a dropdown menu listing all available studies.
- If importing a participant directly into the Registry, select the Global Data Only option.
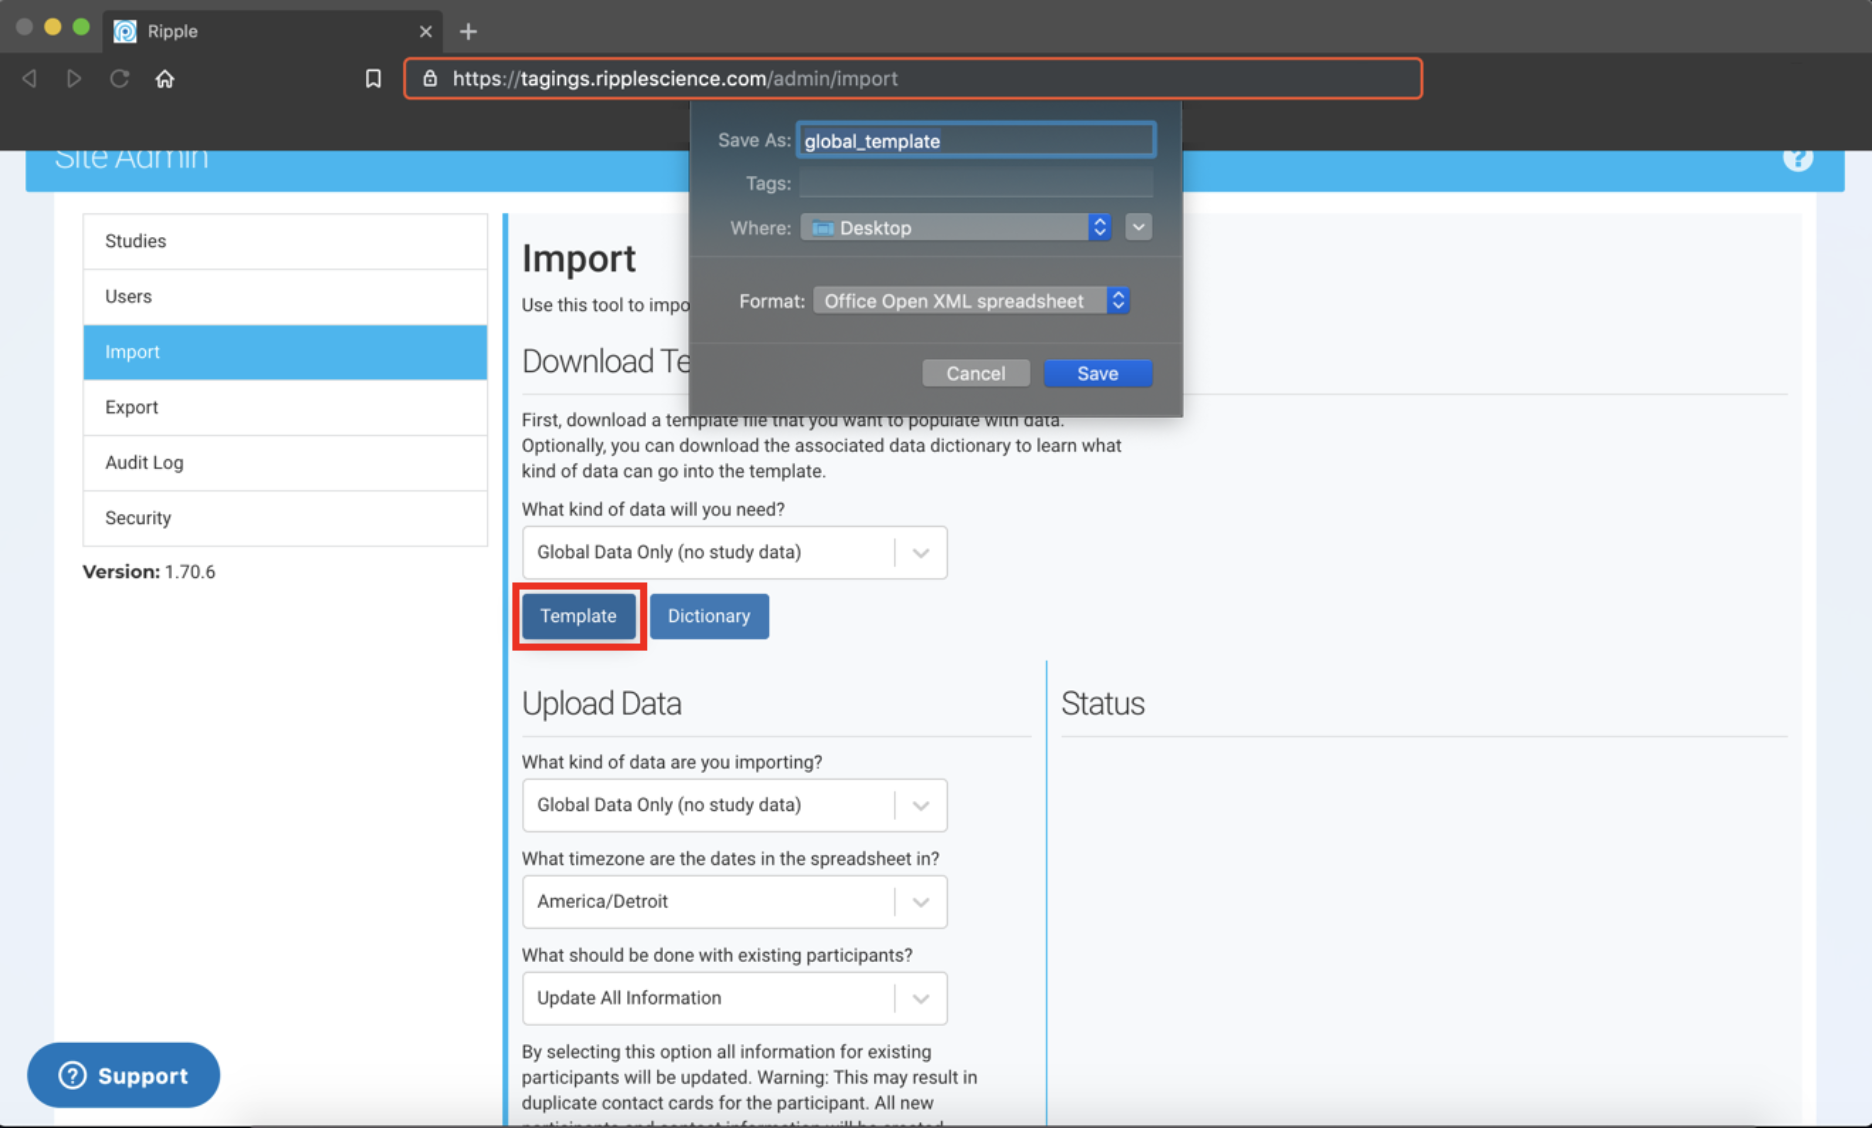
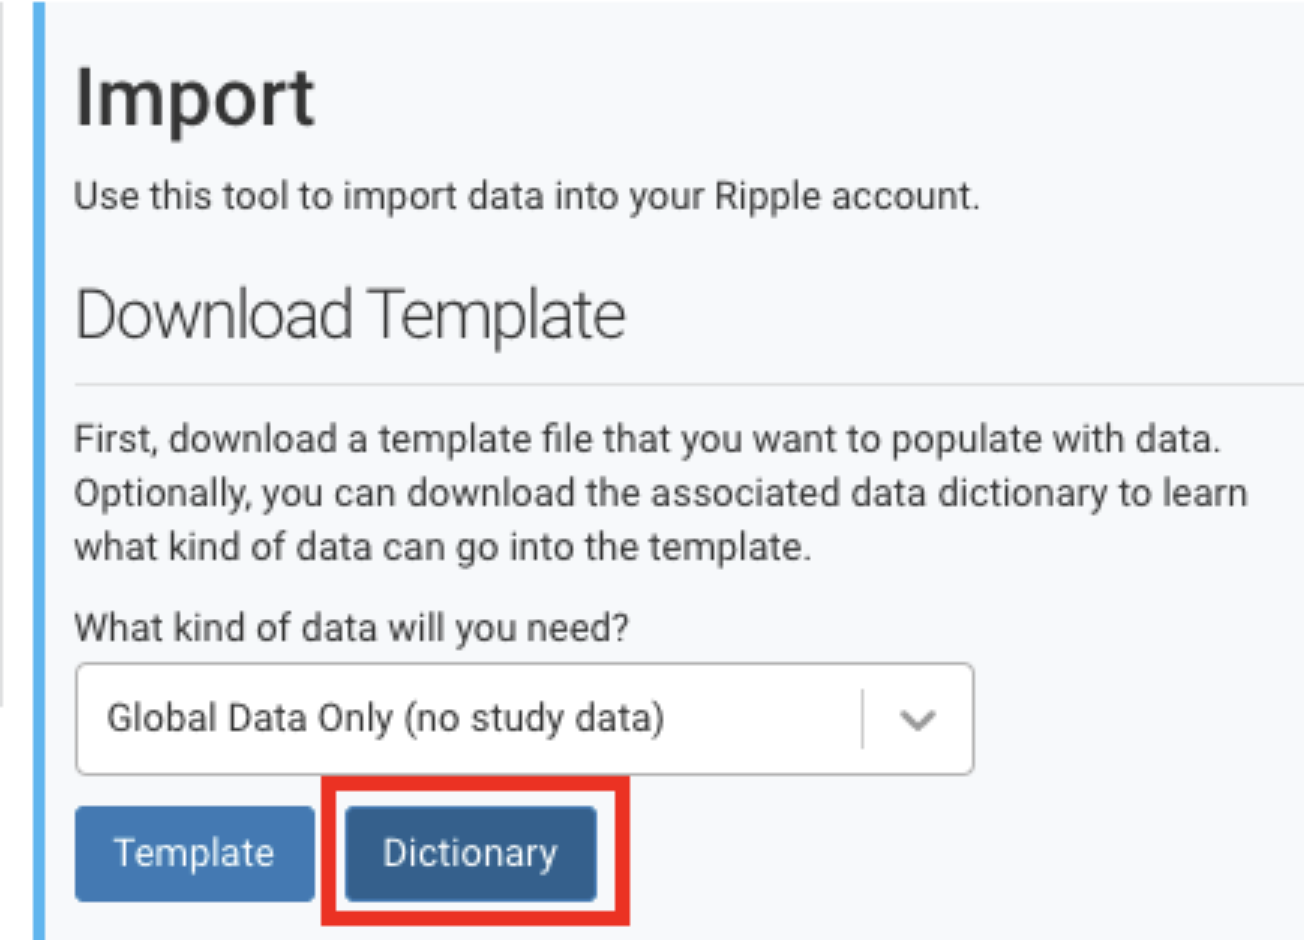
3. Download the Import Template
-
- After selecting a study or the Global Data Only option, click the Template button.
- The system will download an Excel file formatted specifically for your study.
Important: Always use this template for importing logs. Any other format will not be recognized by the system.⚠
4. Log Entry Requirements
-
- When adding logs to existing participants, use one of the following identifiers:
- Global ID
- First Name, Last Name, and Birthdate
- One of these identifiers is required to ensure the logs are imported to the correct participant.
- When adding logs to existing participants, use one of the following identifiers:
TIP: Click on the Dictionary button to find more information on how to enter responses.
For more information about Importing Participants, click here.
Importing Comment Logs

Import Template - Comment Log Fields
When importing Comment Log records via the template, there are two key fields that correspond directly to the comment log records:
-
comment.1.text– Represents the message of the comment.- This field contains the actual text or note added by a team member regarding a participant interaction.
-
comment.1.global– Determines whether the comment is marked as Global.- If set to TRUE, the comment will be marked as a global entry and accessible across all studies.
- If set to FALSE, the comment will be associated only with the specific study to which the participant belongs.
Key Notes for Importing Comment Logs:
- The
comment.1.textfield is required to ensure a comment entry is imported. - The
comment.1.globalfield should be set appropriately to indicate the comment's scope. - Additional comment logs may follow a similar pattern (e.g.,
comment.2.text,comment.2.globalfor multiple entries).
Importing Contact Logs
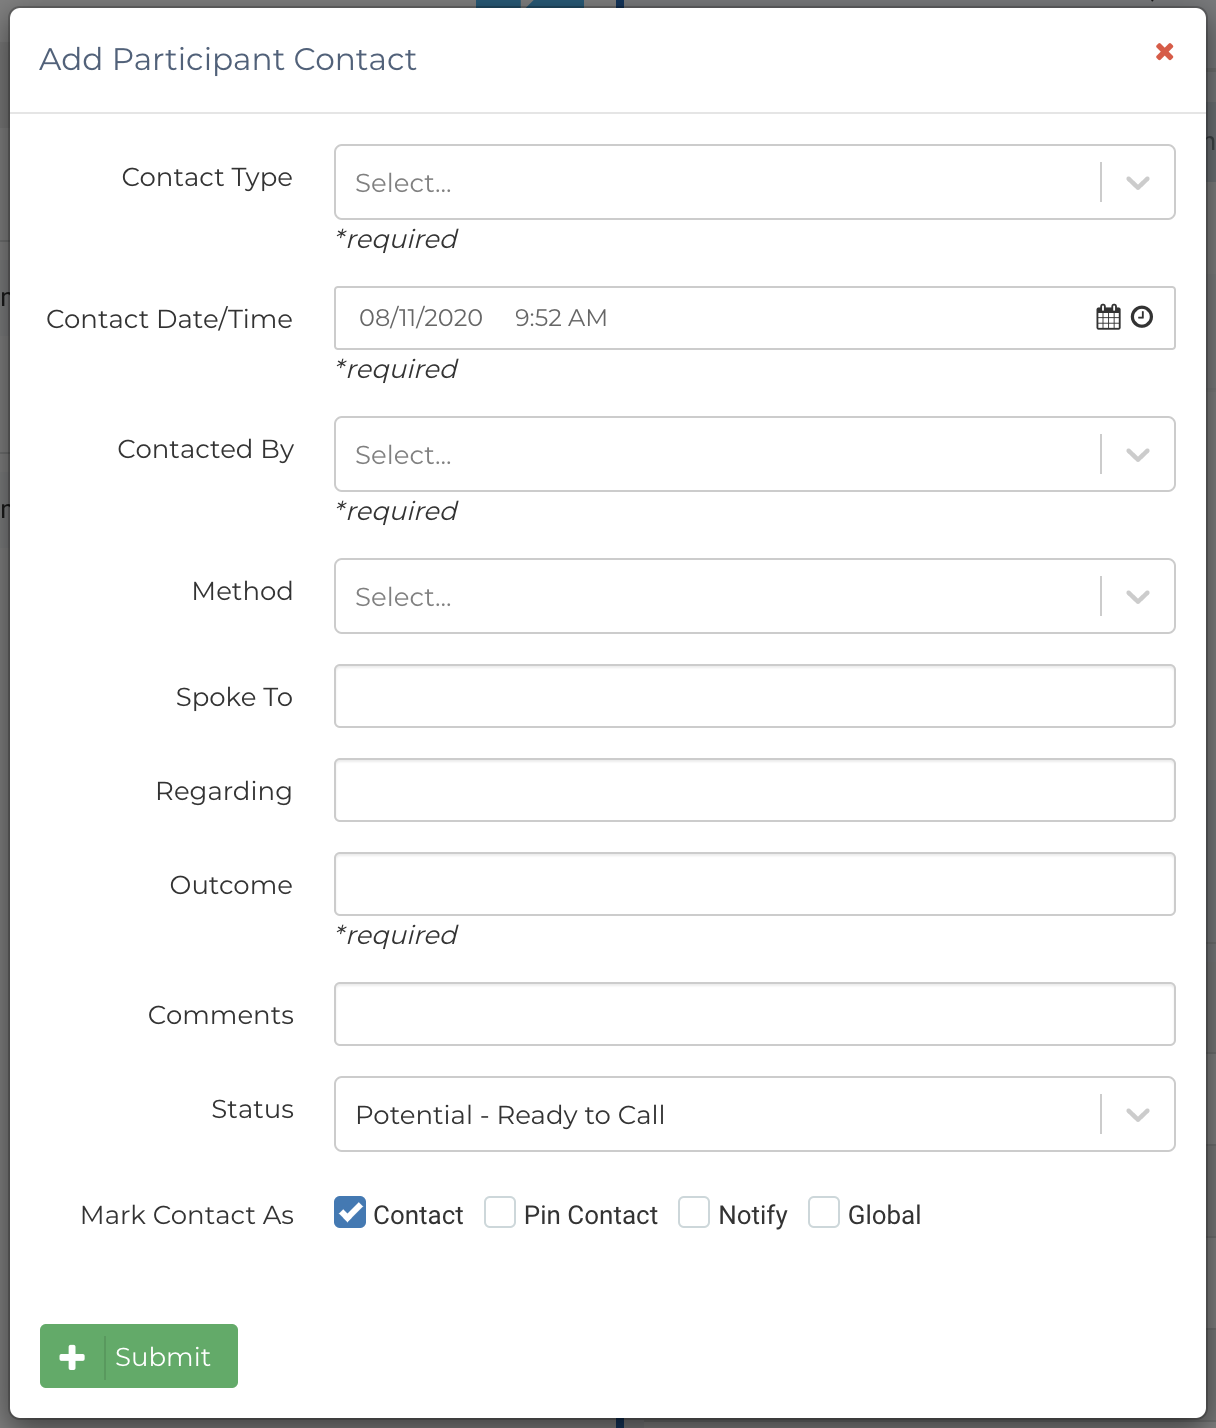
Import Template - Contact Log Fields
When importing Contact Log records, the template includes 11 fields per contact entry that directly match the contact log records. Up to four contacts can be imported per participant in a single import. If more than four contacts need to be imported, multiple imports must be conducted.
Contact Log Fields in the Import Template
Each contact log entry follows this structured format:
-
contact_log.1.global– Marks the contact as Global (TRUE/FALSE).- TRUE: The contact will be visible across all studies.
- FALSE: The contact is associated only with the specific study.
-
contact_log.1.notify– Indicates whether the team was notified of this contact (TRUE/FALSE).- TRUE: The system will mark the notification as sent.
- FALSE: No notification will be logged.
- Note: Selecting TRUE does not trigger an actual email—notifications must be handled separately.
-
contact_log.1.sticky– Pins this contact to the top of the participant’s contact list (TRUE/FALSE).- TRUE: Contact remains at the top.
- FALSE: Contact follows the default order.
-
contact_log.1.lastContact– Specifies whether this is the participant’s Global Last Date of Contact (TRUE/FALSE).- TRUE: Updates the participant's last contact date in the system.
- FALSE: No effect on the participant’s last contact date.
-
contact_log.1.comments– Captures comments related to the contact interaction. -
contact_log.1.contactType– Defines the type of contact (e.g., "Phone Call," "In-Person Visit"). -
contact_log.1.contactMethod– Specifies the email, phone number, or method used for the contact. -
contact_log.1.outcome– Documents the outcome of the contact (e.g., "Successful," "Voicemail Left"). -
contact_log.1.regarding– States the purpose of the contact (e.g., "Follow-up Appointment"). -
contact_log.1.spokeTo– Identifies who was spoken to during the contact (e.g., "Participant," "Family Member"). -
contact_log.1.dateTimeOfContact– Records the date and time of contact.- Format: MM/DD/YYYY HH:MM AM/PM
- Example: 03/12/2025 02:30 PM
-
contact_log.1.contactedBy– Names the team member who conducted the contact.
Importing Multiple Contact Logs
- You may import up to four contacts per participant in a single import.
- Additional sets of fields follow the same structure:
contact_log.2.global,contact_log.2.notify, etc.contact_log.3.global,contact_log.3.notify, etc.contact_log.4.global,contact_log.4.notify, etc.
- If more than four contacts need to be imported, complete additional imports as needed.
Important:
- No emails will be sent from an import, even if
contact_log.1.notify = TRUE. - Ensure all date-time entries follow the MM/DD/YYYY HH:MM AM/PM format to prevent errors.
Importing Email Logs
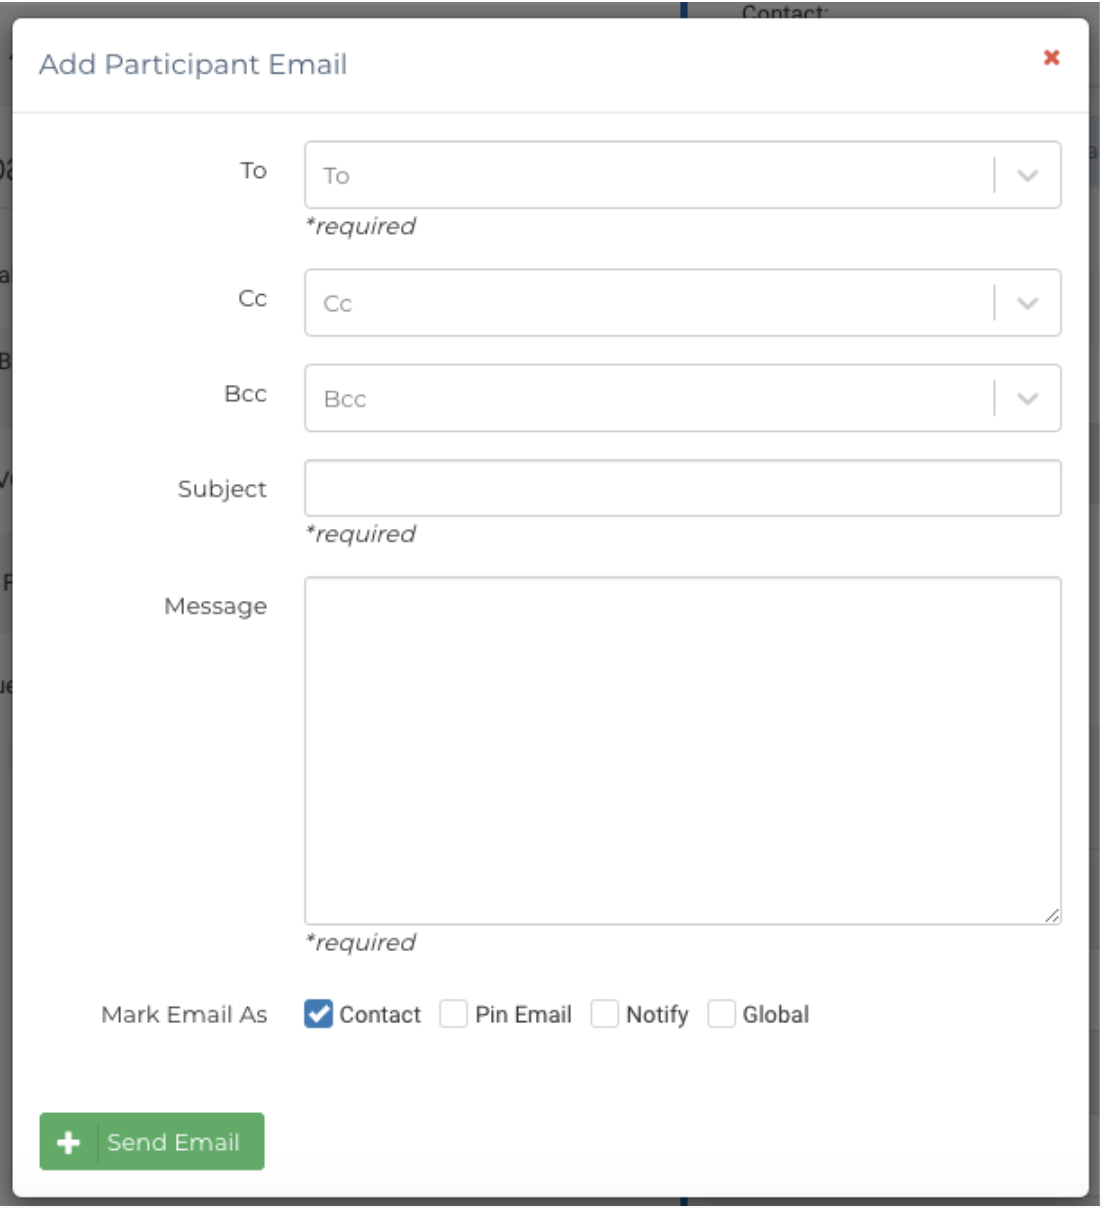
Import Template - Email Log Fields
When importing Email Log records, the template includes 9 fields per email entry that directly match the email log records. Up to four emails can be imported per participant in a single import. If more than four emails need to be imported, multiple imports must be conducted.
Email Log Fields in the Import Template
Each email log entry follows this structured format:
1. Recipient Information
email_log.1.to.1.email– Primary recipient’s email address. (Up to 4 recipients can be added using corresponding fields)email_log.1.to.1.name– Primary recipient’s name. (Up to 4 recipients can be added using corresponding fields)
2. CC (Carbon Copy) Recipients
email_log.1.cc.1.email– CC recipient’s email address. (Up to 4 recipients can be added using corresponding fields)email_log.1.cc.1.name– CC recipient’s name. (Up to 4 recipients can be added using corresponding fields)
3. BCC (Blind Carbon Copy) Recipients
email_log.1.bcc.1.email– BCC recipient’s email address. (Up to 4 recipients can be added using corresponding fields)email_log.1.bcc.1.name– BCC recipient’s name. (Up to 4 recipients can be added using corresponding fields)
4. Email Content
email_log.1.subject– Email subject line.email_log.1.message– The body of the email message.
5. Additional Email Log Attributes
-
email_log.1.lastContact– Marks the email as the Global Last Date of Contact (TRUE/FALSE).- TRUE: Updates the participant’s last contact date in the system.
- FALSE: No effect on the participant’s last contact date.
-
email_log.1.sticky– Pins this email to the top of the email log (TRUE/FALSE).- TRUE: Email remains at the top.
- FALSE: Email follows the default order.
-
email_log.1.global– Marks the email as Global (TRUE/FALSE).- TRUE: The email log entry is visible across all studies.
- FALSE: The email log entry is specific to the participant’s study.
-
email_log.1.notify– Marks the email as having notified your team (TRUE/FALSE).- TRUE: The system will mark the notification as sent.
- FALSE: No notification will be logged.
Important Notes
-
- No emails will be sent from an import, even if
email_log.1.notify = TRUE. - The system does not automatically notify recipients of imported emails.
- Ensure email addresses and names are properly formatted to avoid import errors.
- No emails will be sent from an import, even if
Importing Multiple Email Logs
- You may import up to four emails per participant in a single import.
- Additional sets of fields follow the same structure:
email_log.2.to.1.email,email_log.2.subject,email_log.2.message, etc.email_log.3.to.1.email,email_log.3.subject,email_log.3.message, etc.email_log.4.to.1.email,email_log.4.subject,email_log.4.message, etc.
- If more than four emails need to be imported, complete additional imports as needed.
Importing Consent Logs
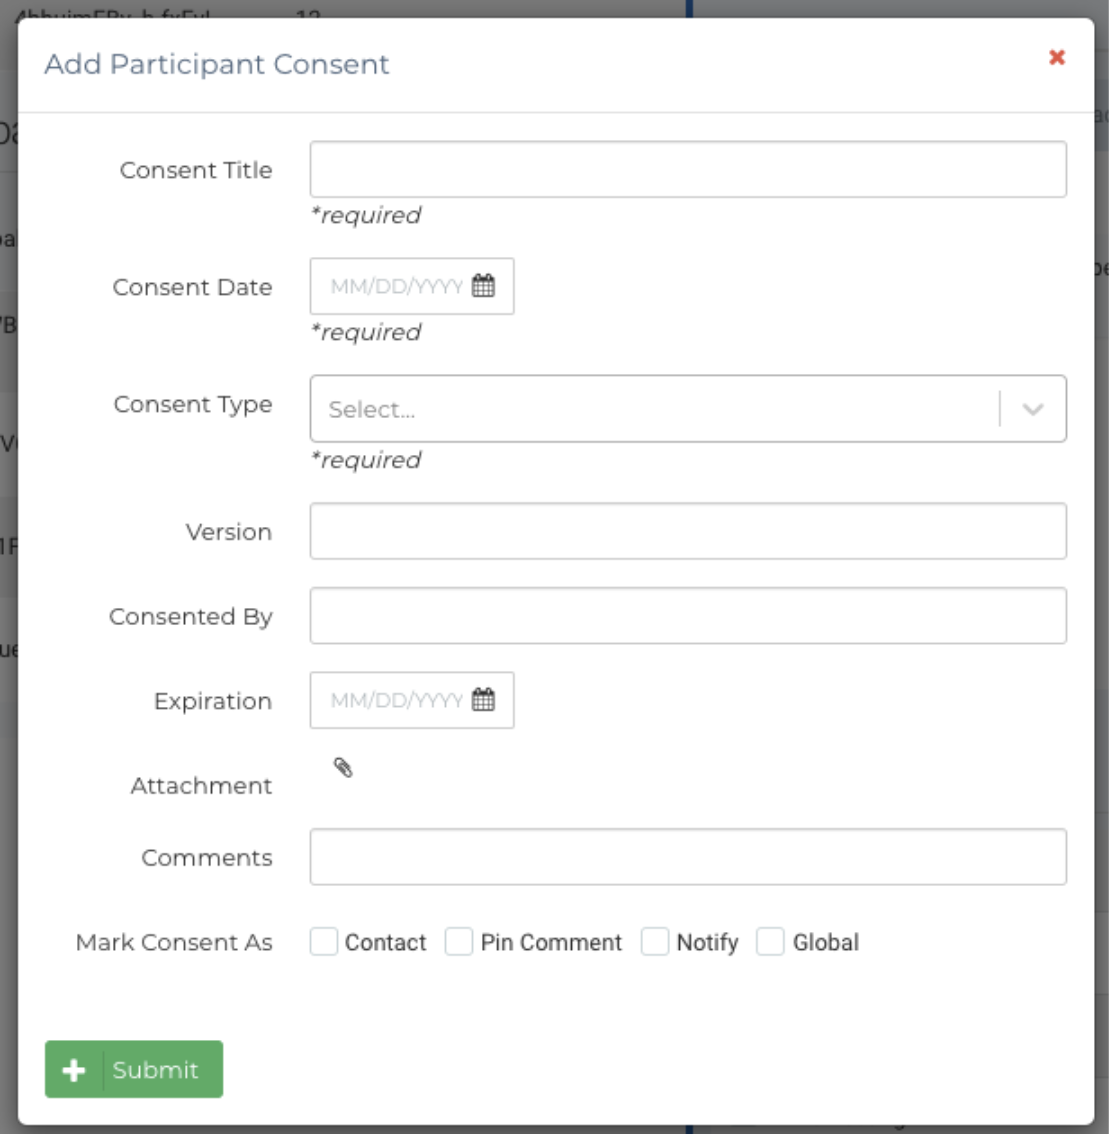
Import Template - Consent Log Fields
When importing Consent Log records, the template includes 11 fields per consent entry that directly match the consent log records. Up to four consent records can be imported per participant in a single import. If more than four consent records need to be imported, multiple imports must be conducted.
Consent Log Fields in the Import Template
1. Consent Details
consent_log.1.consentDate– Date when consent was provided.- Format: MM/DD/YYYY
consent_log.1.consentType– Type of consent (e.g., "General," "Research," "Treatment").consent_log.1.consentTitle– Name of the consent document or agreement.consent_log.1.expiration– Expiration date of the consent (if applicable).- Format: MM/DD/YYYY
consent_log.1.consentedBy– Name of the individual who provided consent.consent_log.1.version– Version of the consent document (if applicable).consent_log.1.comments– Additional notes or comments related to the consent.
2. Consent Log Attributes
-
consent_log.1.lastContact– Marks the consent record as the Global Last Date of Contact (TRUE/FALSE).- TRUE: Updates the participant’s last contact date in the system.
- FALSE: No effect on the participant’s last contact date.
-
consent_log.1.sticky– Pins this consent record to the top of the consent log (TRUE/FALSE).- TRUE: Consent remains at the top.
- FALSE: Consent follows the default order.
-
consent_log.1.global– Marks the consent record as Global (TRUE/FALSE).- TRUE: The consent log entry is visible across all studies.
- FALSE: The consent log entry is specific to the participant’s study.
-
consent_log.1.notify– Marks the consent record as having notified your team (TRUE/FALSE).- TRUE: The system will mark the notification as sent.
- FALSE: No notification will be logged.
Important:
- Selecting TRUE does not trigger an actual email—notifications must be handled separately.
Importing Multiple Consent Records
- You may import up to four consent records per participant in a single import.
- Additional sets of fields follow the same structure:
consent_log.2.consentDate,consent_log.2.consentType,consent_log.2.version, etc.consent_log.3.consentDate,consent_log.3.consentType,consent_log.3.version, etc.consent_log.4.consentDate,consent_log.4.consentType,consent_log.4.version, etc.
- If more than four consent records need to be imported, complete additional imports as needed.
Important Notes:
- Consent record documents cannot be attached through the import tool.
- No emails will be sent from an import, even if
consent_log.1.notify = TRUE. - Ensure date fields follow the MM/DD/YYYY format to avoid import errors.
Exporting Logs
To export logs from your study, use the Export Tool (green) located in the Site Admin tab. Follow the steps below to ensure a successful export.
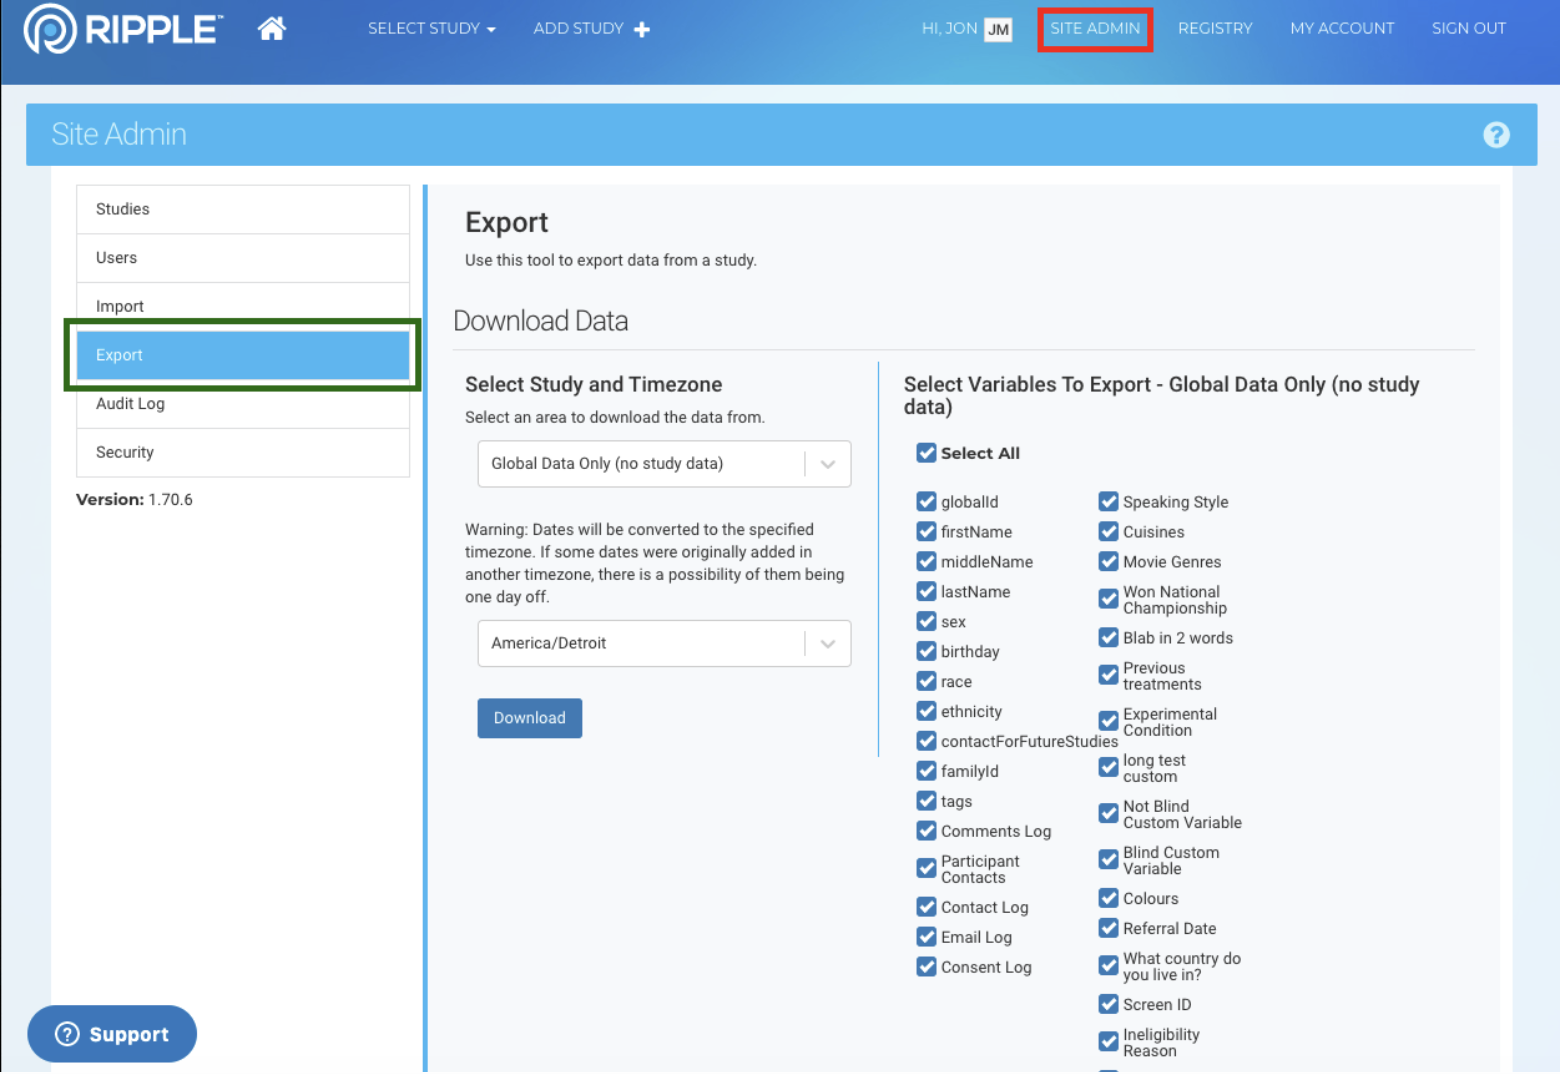
Steps to Export Logs
-
Access the Export Tool
- Navigate to the Site Admin tab (red).
- Click on the Export Tool (green).
-
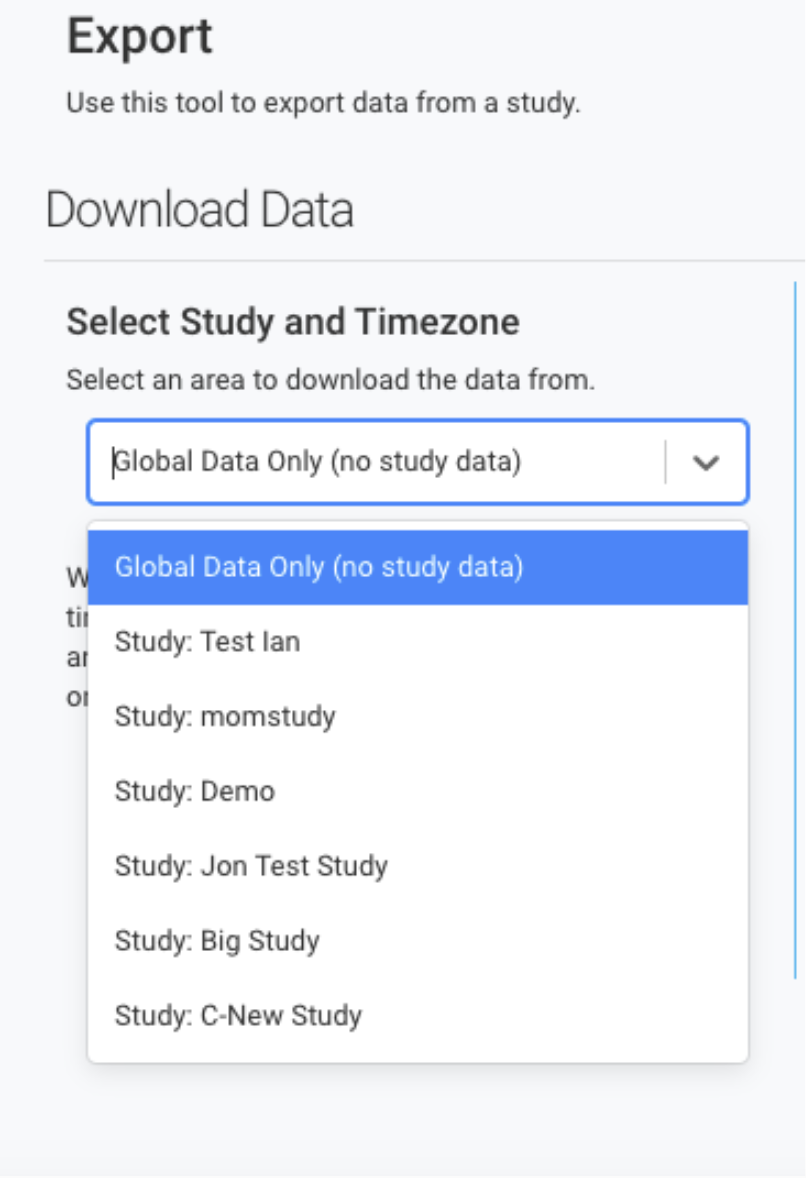
Select the Study
- Choose the study you wish to export logs from.
- If you want to export Global Data stored in the Registry, select Global Data Only instead.
- Example: Selecting "Jon Test Study" for this process.
3. Choose Variables for Export
-
-
- Select the data fields you need in your export file.
- Example: Selecting Global ID, First Name, Last Name, Birthdate, Comments Log, Contact Log, Email Log, and Consent Log.
-

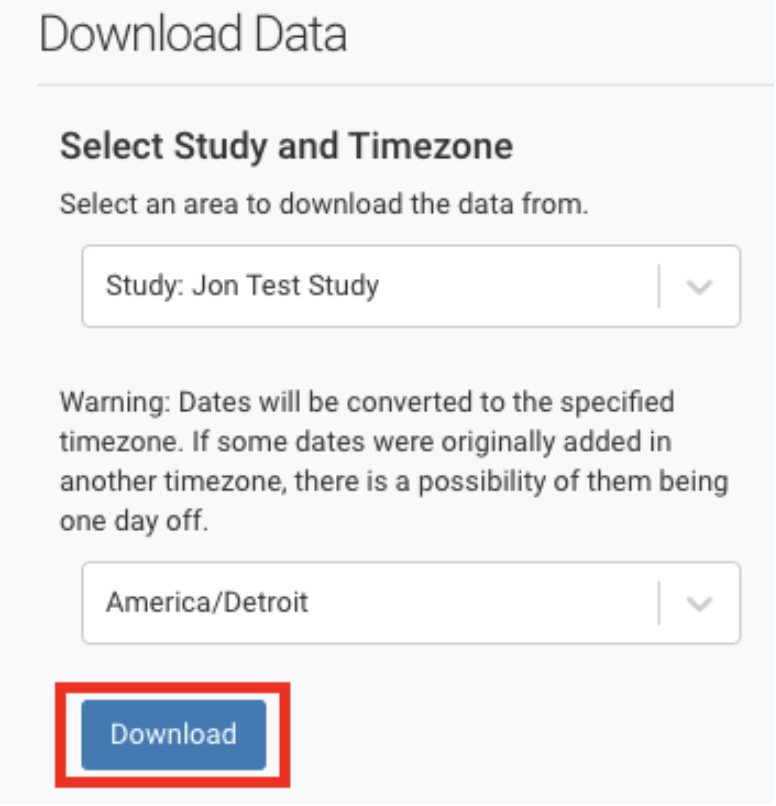
4. Download the Data
-
- Click the Download Button (red).
- The system will generate an Excel file containing logs for all participants in the selected study.
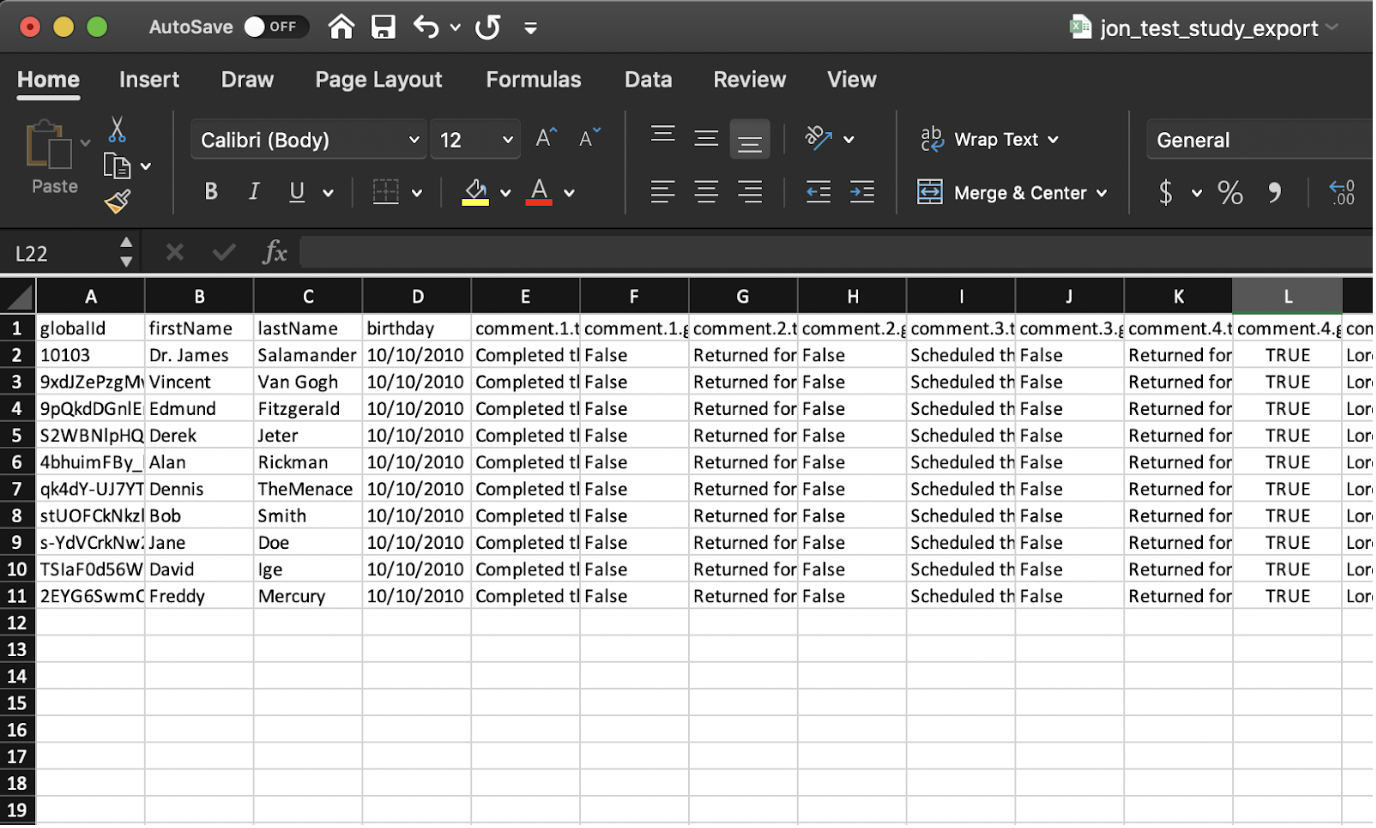
5. Review the Exported Data
-
- Your exported data will appear in an Excel spreadsheet format.
- The sheet will include all logs and participant data fields you selected for export.
Key Notes for Exporting Logs
-
- The exported file will contain only the logs and variables you selected during the export process.
- If exporting Global Data Only, the file will contain logs stored in the Registry that are not study-specific.
- Ensure you review the exported data for completeness before further processing.