The Image Element allows you to enhance your email content by adding visuals. Images can support your message, strengthen your branding (e.g., adding a logo), and guide recipients toward a call-to-action. Like the Button Element, images can also be interactive and trigger actions when clicked.
Add the Image Element to Your Email Template
Adding the Image Element to your email template is simple and allows you to incorporate visuals that enhance your email content and branding.
Steps to Add an Image to Your Email Template
-
Navigate to the Content Section:
- Ensure you are in the Content section of the email editor where elements can be added to the email body.
-
Select the Image Element:
- Locate the IMAGE icon in the content panel.
-
Drag and Drop the Image Element:
- Click on the IMAGE icon, hold it, and drag it into the email body.
- Place the image element where you want it to appear within the template.
-
Upload Your Image:
- Click on the placeholder image in the email body to upload your desired image file.
- Choose a high-quality image that aligns with your email’s purpose and branding.

Properties of the Image Element
The Image Element offers customization options to enhance your email's visual appeal. These properties can be modified in either Desktop Mode or Mobile Mode, though certain features are exclusive to Desktop Mode.
Desktop vs. Mobile Mode
-
Desktop Mode:
Includes full styling and functionality options for the Image Element.
-
Mobile Mode:
Limited styling options. The following features are not available in Mobile Mode:
-
Smart Image Functionality: Use AI to generate images.
-
Upload Options: Upload an image from your computer or a URL.
-
Alternate Text: Provide text that appears if the image cannot load.
-
Actions: Assign actions like opening a survey, sending an email, or initiating a phone call when the image is clicked.
-
Key Features of the Image Element
1. Smart Image Functionality
-
Uses AI to generate custom images based on your description.
-
-
Enter an image description in the Smart Image field.
-
Example: "A professional team working in a research lab."
Steps to Use Smart Image:
-
-
Click “Generate Images”.
-
Select from the generated image options to insert into your email.
-

-
2. Upload an Image
-
Choose an image from your computer or add one via a URL.
3. Alternate Text
-
Add a description for your image to display if the image fails to load.
-
Helps improve accessibility and email usability.
4. Set Actions
-
Make the image interactive by assigning an action when clicked:
-
Open a Survey: Link the image to a survey URL.
-
Send an Email: Add a mailto link for direct email communication.
-
Initiate a Phone Call: Use a tel link to enable calling on mobile devices.
-
Benefits of the Image Element
-
Enhances Engagement: Visuals make emails more appealing.
-
Supports Accessibility: Alternate text ensures usability for all recipients.
-
Encourages Action: Clickable images can direct recipients to perform specific tasks (e.g., completing surveys).
By leveraging the Image Element's properties, you can create visually engaging, functional, and accessible email template.
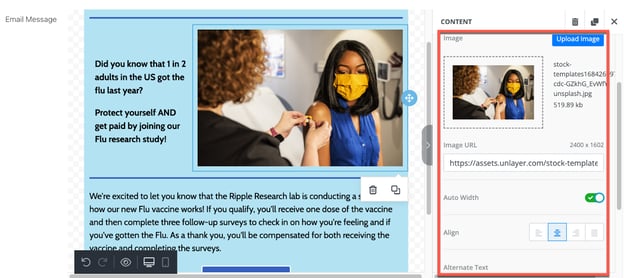
Image Section: Customization Options
The Image Section allows you to upload an image and adjust its formatting to align with your email’s design and purpose. Below are the customization options available for the Image Section:
Customization Options
-
Image Upload:
- Upload an image directly from your computer or insert an image URL from an online source.
-
Auto Width:
- When enabled, the image automatically adjusts to fit its container.
- Toggle Auto Width off to manually resize the image and make it smaller.
-
Align:
- Position the image within the column or row by selecting one of the following options:
- Left
- Center
- Right
- Justified
- Position the image within the column or row by selecting one of the following options:
-
Alternate Text:
- Add a description of the image that conveys its purpose in the email.
- Accessibility Benefits:
- This text is read aloud by screen reader software, aiding visually impaired recipients.
- It also displays if the image fails to load, such as when the file is missing or blocked by the recipient’s email client.
Example of Alternate Text Usage:
- Image: A study logo
- Alternate Text: "Logo of [Study Name] Research Program"
- Scenario: If the image fails to load, the alternate text will appear, ensuring recipients understand the intended purpose of the image.
By customizing these settings, you can create a visually appealing and accessible email that effectively communicates your message.
Action Section: Image Interactivity
The Action Section allows you to assign an action to an image, making it interactive. When participants click on the image, they can be directed to perform one of the following actions:
Available Actions
-
Open Website:
- Redirect participants to a specific URL.
- Options:
- Open the link in a new tab or the same tab.
- Example: Clicking the image takes participants to your study’s homepage or a survey link.
-
Send Email:
- Opens an email message in the participant’s default email client.
- Customization:
- Pre-fill the recipient’s email address, subject line, and email body.
- Example: Clicking the image opens an email to “studyteam@researchprogram.com” with the subject line “Questions about the study.”
-
Call Phone Number:
- Initiates a phone call to a specified number.
- Requirements: This action only works if participants are using a mobile device.
- Example: Clicking the image starts a call to “+1 (800) 123-4567” for participant support.
Steps to Set an Action
- Select the image in your email template.
- Navigate to the Action Section in the editor.
- Choose the desired action (e.g., Open Website, Send Email, or Call Phone Number).
- Input the required details (e.g., URL, email address, or phone number).
- Save your changes and test the functionality before sending the email.
Benefits of Using Actions
- Increased Engagement: Encourages participants to take immediate action.
- Simplified Communication: Makes it easier for participants to contact your team or access resources.
- Mobile-Friendly: Supports phone call actions for participants on mobile devices.
By leveraging the Action Section, you can make your emails more interactive and participant-friendly.
General Section: Adjusting Padding for the Image Element
The General Section gives you control over the padding around the image, allowing you to adjust the spacing between the image and the column or row it is placed in. This ensures your image is visually balanced and fits well within your email design.
Customization Options
-
Padding:
- Adjust the space between the image and its surrounding column or row.
- Padding can be uniform or customized for each side of the image.
-
More Options Toggle (Red):
- Enable the More Options button to adjust padding individually for:
- Top
- Right
- Bottom
- Left
- Enable the More Options button to adjust padding individually for:
Steps to Customize Padding:
- Select the image in your email template.
- Navigate to the General Section in the editor.
- Adjust the padding:
- Use a single value for uniform padding.
- Toggle More Options (red)to specify unique padding values for each side of the image.
- Save your changes and preview the email to ensure the spacing looks balanced.
Benefits of Adjusting Padding
- Improved Visual Appeal: Creates a clean and professional layout.
- Flexible Design: Allows precise control over spacing to fit your email’s aesthetic.
- Enhanced Readability: Ensures the image doesn’t crowd nearby text or elements.
By customizing the padding, you can make your email design more polished and visually appealing.

Responsive Design: Optimizing Images for Different Devices
Responsive design ensures your emails look great and function well on both desktop and mobile devices. The Responsive Design section allows you to customize how images appear—or don’t appear—depending on the device your recipient is using.
Customization Options for Responsive Design
-
Device-Specific Editing:
- Switch between Desktop Mode or Mobile Mode by:
- Clicking the Desktop Icon or Mobile Icon.
- Selecting the Desktop or Mobile tab at the bottom left of the editor.
- Adjust image settings independently for each device type to ensure proper display.
- Switch between Desktop Mode or Mobile Mode by:
-
Hide Image on Specific Devices:
- Use the Hide on Desktop or Hide on Mobile (red) toggle to control image visibility:
- When toggled on, the image will appear faded in the email editor, indicating it will be hidden for participants viewing the email on the specified device.
- Example: You can hide large, detailed images on mobile devices to reduce clutter and optimize load time.
- Use the Hide on Desktop or Hide on Mobile (red) toggle to control image visibility:
-
Optimize Image Display:
- Resize or adjust image alignment separately for desktop and mobile to maintain readability and layout consistency.
Steps to Apply Responsive Design:
- Open your email template in the editor.
- Select the image element you want to customize.
- Switch to Desktop Mode or Mobile Mode using the icons or tabs.
- Make the desired adjustments for each device:
- Resize, align, or toggle Hide on Desktop/Mobile.
- Preview the email on both desktop and mobile views to confirm the design works seamlessly across devices.
Benefits of Responsive Design
- Optimized User Experience: Ensures images look perfect on all devices.
- Improved Load Times: Hiding unnecessary images on mobile reduces email size.
- Professional Presentation: Maintains a clean, user-friendly layout tailored to the recipient’s device.
By leveraging responsive design, you can create emails that are visually appealing and functional, no matter how recipients access them.
